
One Room Challenge: Week Four
Gretchen Rose

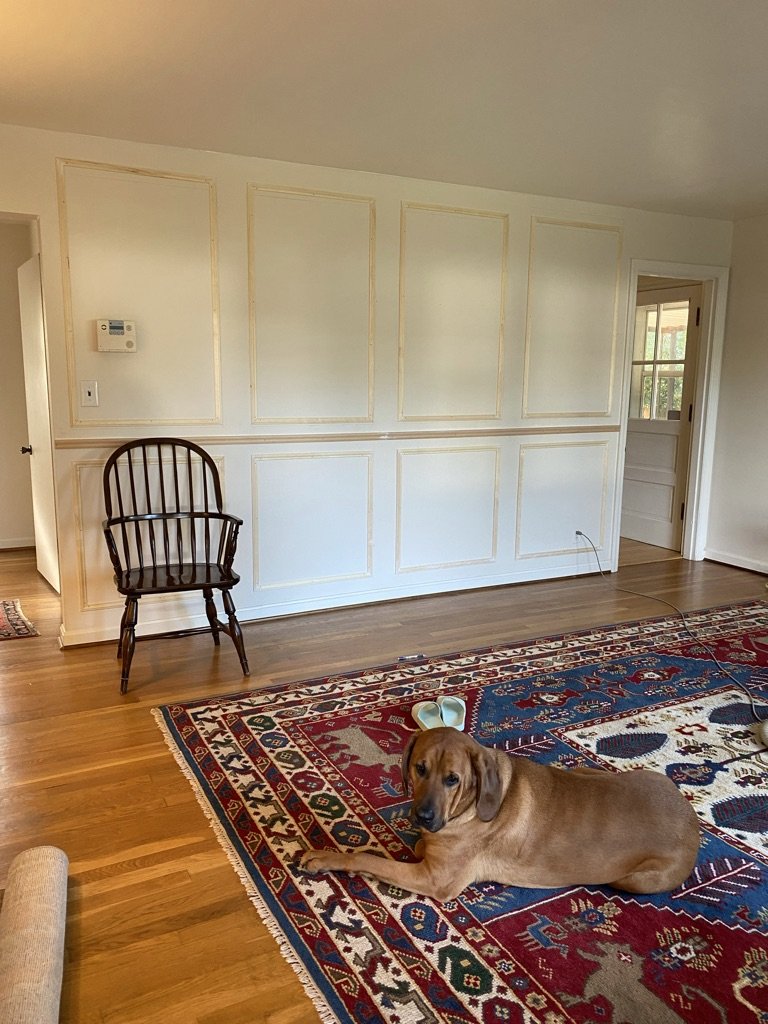
Maker + Me enjoying our new wall.
It is week four of the One Room Challenge, y’all. This is the halfway point!!! I still have quite a bit to accomplish, but I am surely not alone in that regard!
Over the weekend we had a plumbing issue, unrelated to the ORC room (living room). Unfortunately, that has taken a good amount of my time and energy, so I haven’t made a lot of progress this week. Life happens, right?

It is hard to see here, but there are pencil sketches on this wall to test out size/template!
One of the main details of my ORC design plan was picture molding. I love how such a small detail can add so much character to a space! Our home was built in the 1950s, so it has a “little bit” of character already- but I have been swooning over picture molding long enough. Time to try my hand in DIY-ing it!
Materials (found at Home Depot and Lowe’s):
Chair railing/trim pieces: Choose whatever size/thickness you want based on your design goal and scale of room.
I opted to go with 1-1/4” x 8’ for the picture molding here.
I went with a slightly thicker piece for the chair railing that separates top and bottom picture molding (chair rail is optional, and you could use the same size as picture molding if you want).
Measuring tape
Level (here)
Trim/finishing nails
Saw (I used a miter box handheld saw because I went with thin enough trim pieces that it would cut through fairly easily- also I was afraid of the power tools haha). Miter box saw here.
Caulk (to fill holes/cracks between wall and trim since wall isn’t perfectly flat). Make sure to choose a paintable caulk! (option here)

Lincoln wasn’t afraid of this saw, it wasn’t loud!
Steps:
Decide on your layout and take measurements! Be thorough- check where outlets and light switches are. I made sure to create a layout that didn’t require cutting light switch or outlet face plates!
Considerations: Do you want shorter on bottom, taller on top? How many do you want? Do you want a chair rail? How close to the ceiling will you go? Look at pinterest or instagram for inspo- decide how you want it to look before you start cutting!
Draw it on the wall so you can visualize how it will look! Maybe you will change your mind on dimensions- this is a great time to change your mind- versus after everything is cut!
Use a level to ensure your lines are straight. I realized my floors weren’t totally level, so basing measurements off of the floor wasn’t going to work!
Once you have made a layout/template, you know your measurements, and size of trim pieces you want, you can head to the hardware store and purchase the goods!
I purchased two extra 8ft pieces of trim and one extra chair rail piece in case of mistakes so that I wouldn’t have to make another trip back to Lowe’s.
Make the cuts. I am sure you can have this done at your hardware store, but I took mine home and cut them myself with the miter box saw linked above in the Materials section.
Cut at a 45 angle
Make sure the details on trim line up- mine has a non-symmetrical profile so I had to be sure to turn the piece the right way before cutting.
Attach to wall:
I attached chair rail first. Originally I planned to use wood glue of some sort… that did not work. Trim nails did the trick! This would have been a convenient time to have a nail gun, but I went old school with a hammer. I only got my finger a few times!
After chair rail went up, I started with the lower (closer to floor) picture frame molding boxes. I figured if I made any mistakes, they would be less noticeable than the details at eye level!
Continue with top/above chair rail molding.
Caulk the cracks/nail holes.
Make sure this is paintable!
That is pretty much it. This entire process took me about 3 days. A few hours day one deciding on layout/template, day two was purchasing the materials and day three was install. I could have probably managed this in two days, but this was my first time installing any sort of trim so I went slow!

Second to measuring… holding the trim piece & level (while hammering a nail in) was difficult! I need three hands.
Next Steps:
The paint just arrived, and I am beyond excited to get started on that! Wallpaper is here, so I plan to install that after painting the room.
Chandelier install is scheduled for next Tuesday, so I am praying the third time is truly the charm!
I still need to source a few pieces (side tables, artwork etc), but THE RUG is on the way! I cannot wait to see this beauty in person.
I think that is about it for now! How is your project going?!? What do you think of my “trim-work”? Let me know below!
Thank you!
Gretchen
TA-DA! It is up! Lincoln is so proud! Also… I DID THIS!
Don’t forget to check out all of the progress happening over at One Room Challenge, and make sure to support other designers along the way! Thank you!
